
hotpoint dishwasher operating instructions
Hotpoint Dishwasher Operating Instructions: A Comprehensive Guide (Updated 11/30/2025)
Welcome! This detailed manual provides essential guidance for optimal performance of your Hotpoint dishwasher‚ ensuring sparkling clean dishes every time‚ starting today‚ November 30th‚ 2025.
Hotpoint dishwashers are renowned for their reliability and innovative features‚ designed to simplify your kitchen routine. This guide is specifically tailored to help you understand and effectively operate your appliance‚ maximizing its cleaning power and extending its lifespan.
Whether you’ve recently purchased a new model or are familiarizing yourself with an existing one‚ this comprehensive resource will cover everything from initial setup and loading techniques to cycle selection and routine maintenance. We aim to empower you with the knowledge to achieve consistently spotless results‚ saving you valuable time and effort.
Understanding the nuances of your Hotpoint dishwasher‚ as of November 30th‚ 2025‚ will unlock its full potential‚ ensuring years of dependable service and sparkling clean dishes for you and your family. Let’s begin your journey to dishwasher mastery!

Safety Precautions

Prioritizing safety is paramount when operating your Hotpoint dishwasher. Always disconnect the power supply before performing any maintenance or cleaning procedures. Never allow children to operate the dishwasher unsupervised‚ or to play with the door or controls.
Exercise caution when opening the door after a wash cycle‚ as hot steam may escape. Avoid touching the heating element immediately after use‚ as it will be extremely hot. Only use detergents and rinse aids specifically designed for dishwashers‚ following the manufacturer’s instructions carefully.
Do not store flammable materials near the dishwasher. If you detect any unusual smells or noises‚ immediately stop the appliance and consult a qualified technician. As of November 30th‚ 2025‚ adhering to these precautions will ensure safe and reliable operation.
Understanding Your Dishwasher Model
Familiarizing yourself with your specific Hotpoint dishwasher model is crucial for efficient operation. Each model‚ even within the Hotpoint range‚ may have slight variations in features and controls. This section will help you navigate these differences. Refer to the model number‚ typically located on the inside of the door or on the appliance’s rear panel‚ for precise information.
Understanding the internal layout and the function of each component will optimize cleaning performance. Knowing where the filter is located‚ and how to access the spray arms‚ is essential for maintenance. As of November 30th‚ 2025‚ a thorough understanding of your dishwasher’s design will maximize its lifespan and effectiveness.

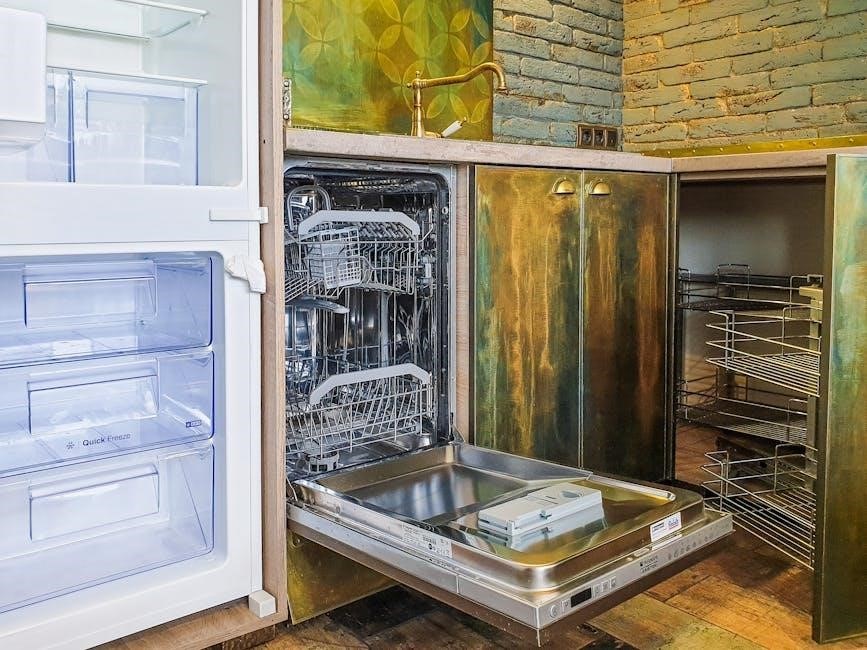
3.1 Identifying Key Components
Let’s pinpoint the essential parts of your Hotpoint dishwasher. The spray arms‚ located on the top‚ middle‚ and sometimes bottom racks‚ distribute water for cleaning. The filter‚ usually at the bottom‚ traps food particles – regular cleaning is vital. The detergent dispenser releases detergent at the appropriate time during the cycle. The rinse aid dispenser ensures spotless drying.
Also‚ identify the float switch‚ preventing overflows‚ and the heating element‚ responsible for drying. Knowing the location of these components‚ as of November 30th‚ 2025‚ will aid in troubleshooting and maintenance. Familiarity with these key parts ensures optimal dishwasher performance and longevity.
3.2 Control Panel Overview
The control panel is your command center. Typically‚ you’ll find a power button for operation‚ and a cycle selection dial or buttons to choose wash cycles like Normal‚ Heavy‚ or Quick. Options buttons allow customization – perhaps a heated dry or sanitize setting. A delay start function lets you schedule washes.
Indicator lights signal cycle progress and any error codes. As of November 30th‚ 2025‚ some models feature digital displays showing cycle time remaining. Understanding these controls is crucial for efficient operation. Refer to your specific model’s diagram for precise button locations and functions. Mastering the control panel unlocks the full potential of your Hotpoint dishwasher.
Loading the Dishwasher Correctly
Proper loading maximizes cleaning performance and prevents damage. Avoid overcrowding; dishes need space for water circulation. Face soiled surfaces towards the spray arms. Top rack is for glasses‚ cups‚ and smaller items – ensure they’re secure to prevent breakage. Bottom rack handles larger items like plates‚ pots‚ and pans.
Utensils go in the basket‚ alternating direction to prevent nesting. Avoid blocking the spray arms. As of November 30th‚ 2025‚ remember that incorrect loading can lead to poorly cleaned dishes. A well-loaded dishwasher saves water‚ energy‚ and ensures sparkling results. Prioritize efficient space utilization for optimal cleaning.
4.1 Top Rack Loading Guidelines
The top rack is designed for delicate items like glasses‚ cups‚ and small bowls. Ensure items are securely placed to prevent movement during the wash cycle and potential breakage. Avoid placing tall items that could obstruct the spray arm’s rotation. Adjustable tines allow for customization to accommodate various dish sizes.

As of November 30th‚ 2025‚ remember to load stemmed glassware upside down for optimal cleaning and to prevent water pooling. Plastic items should also be placed securely. Avoid overcrowding; allow water to reach all surfaces. Proper top rack loading ensures gentle yet effective cleaning‚ preserving your delicate dishware.
4.2 Bottom Rack Loading Guidelines
The bottom rack is ideal for larger‚ heavier items such as pots‚ pans‚ and plates. Face soiled surfaces towards the center for direct spray coverage. Ensure items don’t block the detergent dispenser or the lower spray arm’s rotation – crucial as of November 30th‚ 2025. Utilize the fold-down tines to accommodate oversized cookware effectively.
Avoid nesting bowls or stacking items‚ as this hinders water circulation. Securely position larger items to prevent them from shifting during operation. Proper loading on the bottom rack guarantees thorough cleaning of your most challenging dishes. Remember to check for any obstructions before starting the cycle.
4.3 Utensil Basket Usage
The utensil basket is designed to hold forks‚ spoons‚ knives‚ and smaller serving pieces. Alternate utensil placement – handles down for forks and spoons‚ handles up for knives – to prevent nesting and ensure complete cleaning‚ as of November 30th‚ 2025. Avoid overcrowding; separate utensils for optimal water access.
Long utensils should lie flat to prevent them from protruding and blocking the spray arms. Some baskets feature dividers; utilize these to keep utensil types separate. Regularly check the basket for food debris and remove it before each cycle. Proper utensil loading maximizes cleaning efficiency and prevents re-soiling of other items.
Detergent and Rinse Aid
Optimal cleaning relies on using the correct detergent and rinse aid. Hotpoint dishwashers are compatible with powder‚ gel‚ and tablet detergents‚ as of November 30th‚ 2025. Always use dishwasher detergent specifically formulated for automatic dishwashers; hand dish soap will create excessive suds.
Rinse aid assists in drying by reducing water surface tension‚ preventing spots and streaks. Fill the rinse aid dispenser regularly to maintain optimal performance. Adjust the rinse aid level based on water hardness – higher hardness requires a higher setting. Using the correct amounts of both ensures sparkling clean and dry dishes with every wash cycle.
5.1 Recommended Detergents
Hotpoint dishwashers‚ as of November 30th‚ 2025‚ perform exceptionally well with a variety of detergent types. We recommend leading brands like Cascade‚ Finish‚ and Seventh Generation for consistently excellent results. Powder detergents are cost-effective‚ while gel detergents dissolve quickly‚ ideal for shorter cycles. Tablets offer pre-measured convenience‚ minimizing waste.
For optimal performance‚ consider detergents with enzymes to break down food particles and bleach for stain removal. Avoid detergents containing chlorine‚ as they can damage certain dishware. Always check the detergent packaging for compatibility with your water hardness level. Experiment to find the detergent that best suits your needs and preferences.
5.2 Detergent Dosage
Determining the correct detergent dosage is crucial for effective cleaning‚ as of November 30th‚ 2025. Hotpoint dishwashers feature a detergent dispenser designed for precise measurement. For lightly soiled loads‚ use 1.5 tablespoons of powder or gel detergent‚ or one detergent tablet. Medium soil requires 2 tablespoons or two tablets. Heavily soiled dishes necessitate 2.5 tablespoons or three tablets.
Water hardness significantly impacts detergent needs; harder water demands more detergent. Consult your local water authority for hardness information. Overusing detergent can leave residue‚ while underusing results in poor cleaning. Always refer to the detergent packaging for specific dosage recommendations and adjust accordingly for optimal results.
5.3 Using Rinse Aid
Rinse aid enhances drying performance and prevents water spots‚ particularly important as of November 30th‚ 2025. Locate the rinse aid dispenser‚ typically near the detergent compartment. Fill the dispenser until the indicator window shows it’s full. Adjust the rinse aid level using the control dial‚ ranging from 1 to 6; a lower number uses less rinse aid.
Start with a setting of 3 and adjust based on your water hardness and desired results. Harder water requires a higher setting. Rinse aid helps water sheet off dishes‚ promoting faster drying and a sparkling finish. Regularly check the rinse aid level and refill as needed to maintain optimal performance and avoid spotting.
Selecting the Right Wash Cycle
Choosing the correct wash cycle is crucial for efficient cleaning and protecting your dishes‚ especially considering today’s date‚ November 30th‚ 2025. Hotpoint dishwashers offer a variety of cycles tailored to different needs. The Normal/Regular cycle is ideal for everyday loads with moderate soiling. For heavily soiled pots and pans‚ select the Heavy Duty cycle.
Delicate items like glassware benefit from the Delicate/Glassware cycle‚ using a gentler wash action. When time is limited‚ the Quick Wash cycle provides a faster‚ though less intensive‚ clean. Consult your dishwasher’s specific model guide for additional cycle options and recommendations for optimal results.
6.1 Normal/Regular Cycle
The Normal/Regular cycle is your go-to option for most daily dishwashing needs‚ as of November 30th‚ 2025. This cycle balances cleaning power with energy efficiency‚ making it suitable for moderately soiled dishes‚ glasses‚ and cutlery. It utilizes a combination of water temperatures and wash actions to effectively remove food residue.
Typically‚ this cycle includes a pre-wash‚ main wash‚ and rinse‚ ensuring thorough cleaning. Load your dishwasher with a typical household load‚ ensuring items aren’t blocking the spray arms. For best results‚ use the recommended amount of detergent and rinse aid. This cycle generally takes between 120-150 minutes to complete‚ providing a reliable clean for everyday use.
6.2 Heavy Duty Cycle
The Heavy Duty cycle‚ updated as of November 30th‚ 2025‚ is designed for tackling the toughest‚ most stubborn food soils. This cycle employs higher water temperatures and increased wash pressure to effectively remove baked-on food‚ grease‚ and grime. It’s ideal for pots‚ pans‚ casserole dishes‚ and heavily soiled items.
Expect a longer wash time – typically between 180-210 minutes – as this cycle prioritizes deep cleaning. Ensure items are loaded securely to withstand the powerful water jets. Using a higher dosage of detergent is recommended for optimal results‚ alongside rinse aid for spotless drying. This cycle is not suitable for delicate items; always check your dishware’s care instructions before use.

6.3 Delicate/Glassware Cycle
The Delicate/Glassware cycle‚ as of November 30th‚ 2025‚ is specifically engineered for your most fragile dishware. This cycle utilizes lower water temperatures and a gentler wash action to prevent chipping‚ cracking‚ or damage to delicate items like glassware‚ crystal‚ and fine china.
It’s crucial to use a detergent formulated for delicate washes and ensure rinse aid is utilized to avoid water spotting. Load items securely‚ ensuring they don’t touch each other to minimize the risk of breakage. This cycle typically runs for approximately 90-120 minutes. Avoid overloading‚ as this can compromise cleaning performance and increase the risk of damage. Always verify item suitability before selecting this cycle.
6.4 Quick Wash Cycle
The Quick Wash cycle‚ updated as of November 30th‚ 2025‚ is designed for lightly soiled dishes needing a fast refresh. This cycle utilizes increased water pressure and a shorter wash duration – typically around 30-45 minutes – making it ideal for daily use or when you’re short on time.
While efficient‚ it’s important to note that the Quick Wash cycle may not be suitable for heavily soiled items or baked-on food residue. Pre-rinsing dishes is recommended for optimal results. Use a standard detergent dosage and ensure the spray arms are clear for proper water circulation; Avoid overloading to maintain cleaning effectiveness. This cycle prioritizes speed over intensive cleaning.
Operating the Dishwasher ⎯ Step-by-Step
To begin‚ ensure your Hotpoint dishwasher is properly loaded following the guidelines detailed in Section 4‚ as of November 30th‚ 2025. Add the recommended amount of detergent (Section 5) and rinse aid. Close the door securely.
Next‚ select your desired wash cycle (Section 6) using the control panel. Press the ‘Start’ button to initiate the cycle. The dishwasher will automatically fill with water‚ wash‚ rinse‚ and dry your dishes. Do not interrupt the cycle unless absolutely necessary. Once complete‚ allow the dishes to cool before unloading. Always check for cleanliness and repeat the cycle if needed. Refer to troubleshooting (Section 8) if issues arise.
Troubleshooting Common Issues
Encountering problems? If your Hotpoint dishwasher isn’t starting (Section 8.1)‚ verify the power supply and door latch. For dishes not cleaning properly (Section 8.2)‚ check loading patterns‚ detergent dosage‚ and water temperature. Ensure spray arms aren’t blocked.
Leaking issues (Section 8.3) could stem from improper door sealing‚ overloaded racks‚ or a damaged water inlet valve. Inspect these areas first. If problems persist after November 30th‚ 2025‚ consult the full manual or contact Hotpoint customer support. Never attempt repairs yourself if you are not qualified. Always disconnect power before inspecting internal components. A detailed diagnostic checklist is available online.
8.1 Dishwasher Not Starting
Dishwasher won’t power on? First‚ confirm the appliance is properly plugged into a functioning electrical outlet. Check your home’s circuit breaker or fuse box to ensure the dishwasher’s circuit hasn’t tripped or blown‚ especially after November 30th‚ 2025.
Next‚ verify the door is securely latched. The dishwasher won’t start if the door isn’t fully closed. Inspect the latch mechanism for any obstructions or damage. If these steps don’t resolve the issue‚ there might be a problem with the control panel or internal wiring. Do not attempt self-repair; contact a qualified technician for assistance.
8.2 Dishes Not Cleaning Properly
Dishes still dirty after a wash? Several factors could contribute to this issue. Ensure you’re using the correct amount of detergent‚ as recommended in section 5.2‚ and that it’s fresh. Verify the spray arms (see section 9.2) aren’t clogged with food particles‚ hindering water circulation.
Also‚ confirm dishes are loaded correctly (sections 4.1‚ 4.2‚ and 4.3) to allow water to reach all surfaces. A heavily soiled load may require the ‘Heavy Duty’ cycle (section 6.2). Finally‚ check the dishwasher filter (section 9.1) for debris; a dirty filter reduces cleaning effectiveness‚ especially after November 30th‚ 2025.
8.3 Leaking Issues
Discovering a leak? First‚ immediately stop the dishwasher cycle to prevent further water damage. Check the door seal for any cracks or debris that might be preventing a tight closure. Ensure the dishwasher is level; an uneven unit can cause water to spill.
Inspect the water inlet hose and drain hose connections for looseness or damage. Verify the drain hose isn’t kinked or clogged. If the leak persists after November 30th‚ 2025‚ and you’ve checked these areas‚ there might be an internal component issue requiring professional service. Do not attempt repairs yourself if you are uncomfortable.
Dishwasher Maintenance
Regular maintenance is crucial for extending the life and maintaining the efficiency of your Hotpoint dishwasher. Aim to perform these tasks monthly‚ or more frequently with heavy use‚ especially after November 30th‚ 2025.

Focus on cleaning the filter to remove food particles and prevent clogs. Inspect and clean the spray arms to ensure water reaches all dishes effectively. Wipe down the interior with a damp cloth and mild detergent. Run an empty cycle with dishwasher cleaner periodically to eliminate odors and buildup. Proper care ensures sparkling results and prevents costly repairs.
9.1 Cleaning the Filter
The dishwasher filter requires regular cleaning to maintain optimal performance‚ especially after the update on November 30th‚ 2025. Locate the filter‚ typically at the bottom of the dishwasher interior. Remove the filter assembly by twisting or lifting‚ consulting your model’s specific instructions.
Rinse the filter under warm running water‚ using a soft brush to remove any trapped food particles or debris. Inspect for damage and replace if necessary. Reinstall the filter securely‚ ensuring it clicks into place. A clean filter prevents clogs‚ ensures efficient water circulation‚ and contributes to sparkling clean dishes. Neglecting this step can lead to reduced cleaning performance.
9.2 Cleaning the Spray Arms
Maintaining clean spray arms is crucial for effective dishwashing‚ particularly following the latest updates as of November 30th‚ 2025. Locate the upper and lower spray arms inside the dishwasher. They can usually be removed by unscrewing or unclipping them – refer to your model’s manual for specifics.

Inspect the spray arm holes for blockages caused by food particles. Use a toothpick or small wire to carefully clear any obstructions. Rinse the spray arms thoroughly under running water. Reattach the spray arms securely‚ ensuring they rotate freely. Clean spray arms guarantee water reaches all dishes‚ maximizing cleaning power and preventing residue buildup. Regular cleaning is essential for optimal performance.
Winterizing Your Dishwasher
Protecting your Hotpoint dishwasher during freezing temperatures‚ as of November 30th‚ 2025‚ is vital to prevent damage. If your dishwasher is in an unheated area‚ take preventative measures. Begin by disconnecting the water supply line and draining all remaining water from the dishwasher‚ including the drain hose.
Pour approximately one quart of RV antifreeze into the dishwasher’s drain pump. Run a short‚ cold-water cycle to distribute the antifreeze throughout the system. This prevents pipes from freezing and bursting. Leave the dishwasher door slightly ajar to allow air circulation. Following these steps will ensure your dishwasher is ready for use when warmer weather returns‚ safeguarding against costly repairs.